
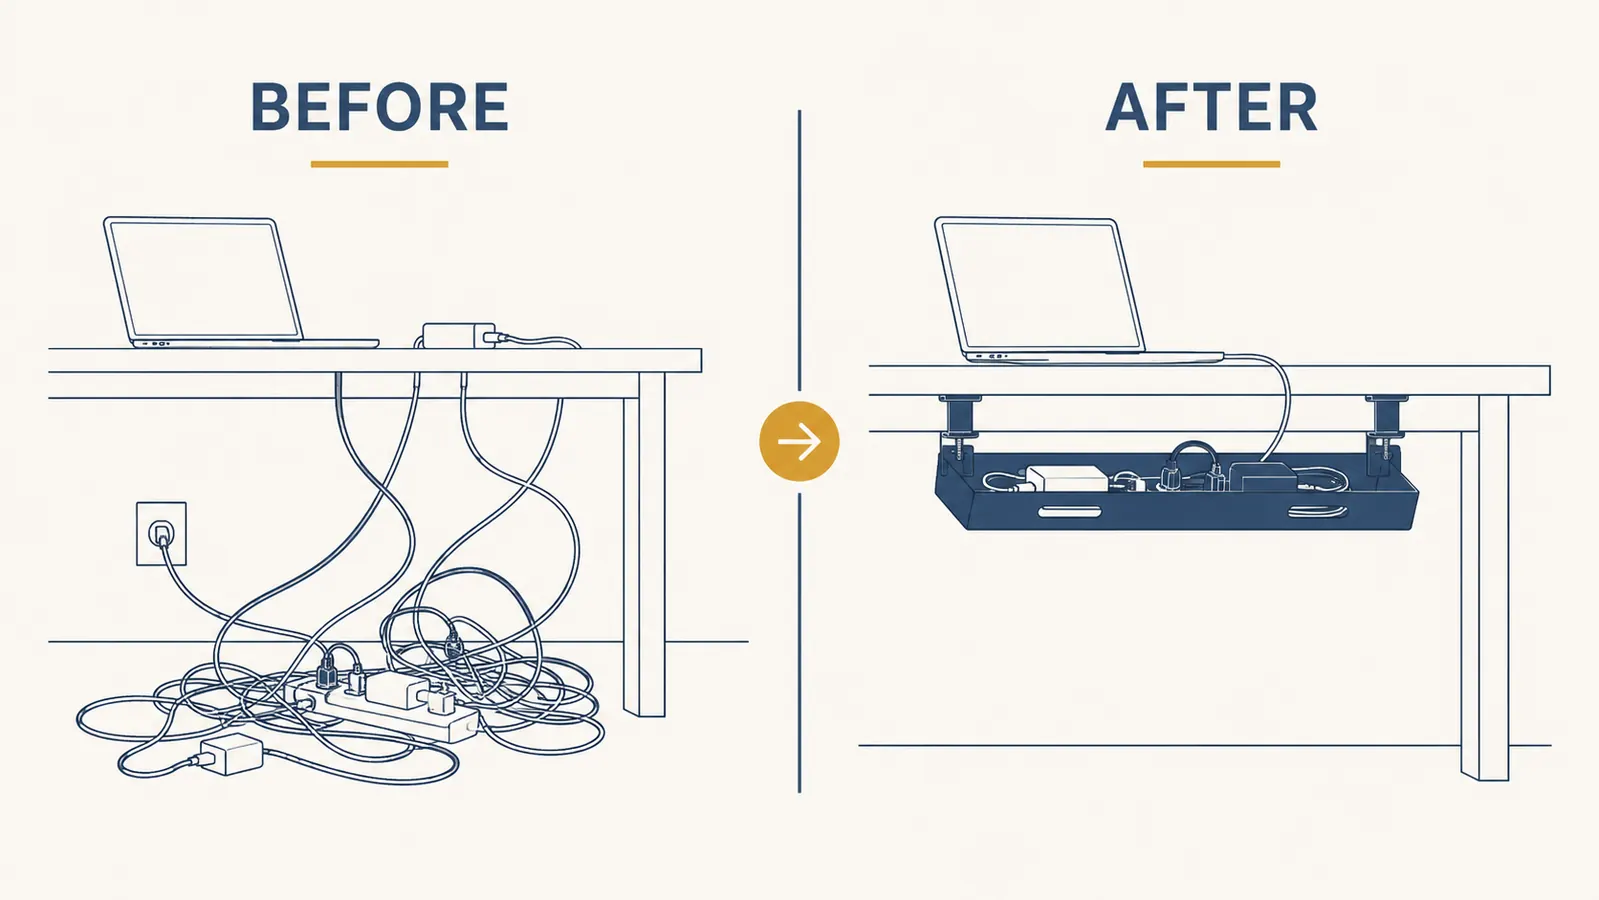
I used to look down from my chair and see a small disaster. Monitor cables, a power strip cord, the laptop charger, the USB hub wire, and somehow a stray phone charger that had migrated under the desk over the winter. Every time I sat down to paint or write, that tangle was there in my peripheral vision, a low-grade irritant I had learned to ignore. But you can only ignore clutter for so long before it starts costing you something, some small piece of focus, some tiny bit of the calm you were hoping to have at your desk. (The piece of gear that finally fixed it: the Cinati cable tray. More on that below.)
The fix is not complicated. It does not require a drill, a landlord's permission, or anything more than an hour on a Sunday morning. This guide walks through exactly how to hide every cable under your desk without making a single hole in anything, using a clamp-mount cable tray, velcro ties, and a handful of adhesive clips. I'll tell you what order to do things in, what to watch out for, and which product has made the biggest difference for renters and apartment workers specifically.
Your floor cables are 20 minutes from disappearing.
The Cinati Under-Desk Cable Management Tray clamps on with no drilling required. It holds a full power strip and all your cords in one hidden bundle. Rated 4.7 stars across 4,000+ buyers.
Amazon Check Today's Price on Amazon →Step 1: Do a Full Cable Audit Before You Touch Anything
Before you buy anything or move a single cord, get down on the floor and actually look at what you have. Pull your chair back and crouch. Count every cable coming off the desk. I found seven the last time I did this, which surprised me. I had been adding one device at a time over two years without ever thinking about where the cord was going.
While you're down there, check the underside of your desk for clamp-mount clearance. Run your hand along the front edge and both sides. You're looking for a lip that's at least three-quarters of an inch thick, which is what most clamp-mount trays and velcro cable straps need to grip. Most desks work. Thin IKEA tabletops with a hollow core sometimes don't, but even there, a tray with a wide clamp plate usually gets a good hold. Note where your wall outlet or power strip sits relative to the desk legs, because that determines where your tray should go.
Trace every cable to its source. Unplug anything that isn't actually being used right now. Dead chargers and old device cables that have been living under there for months are a hidden source of clutter that no cable tray can fix. A little editing now makes the whole job faster.
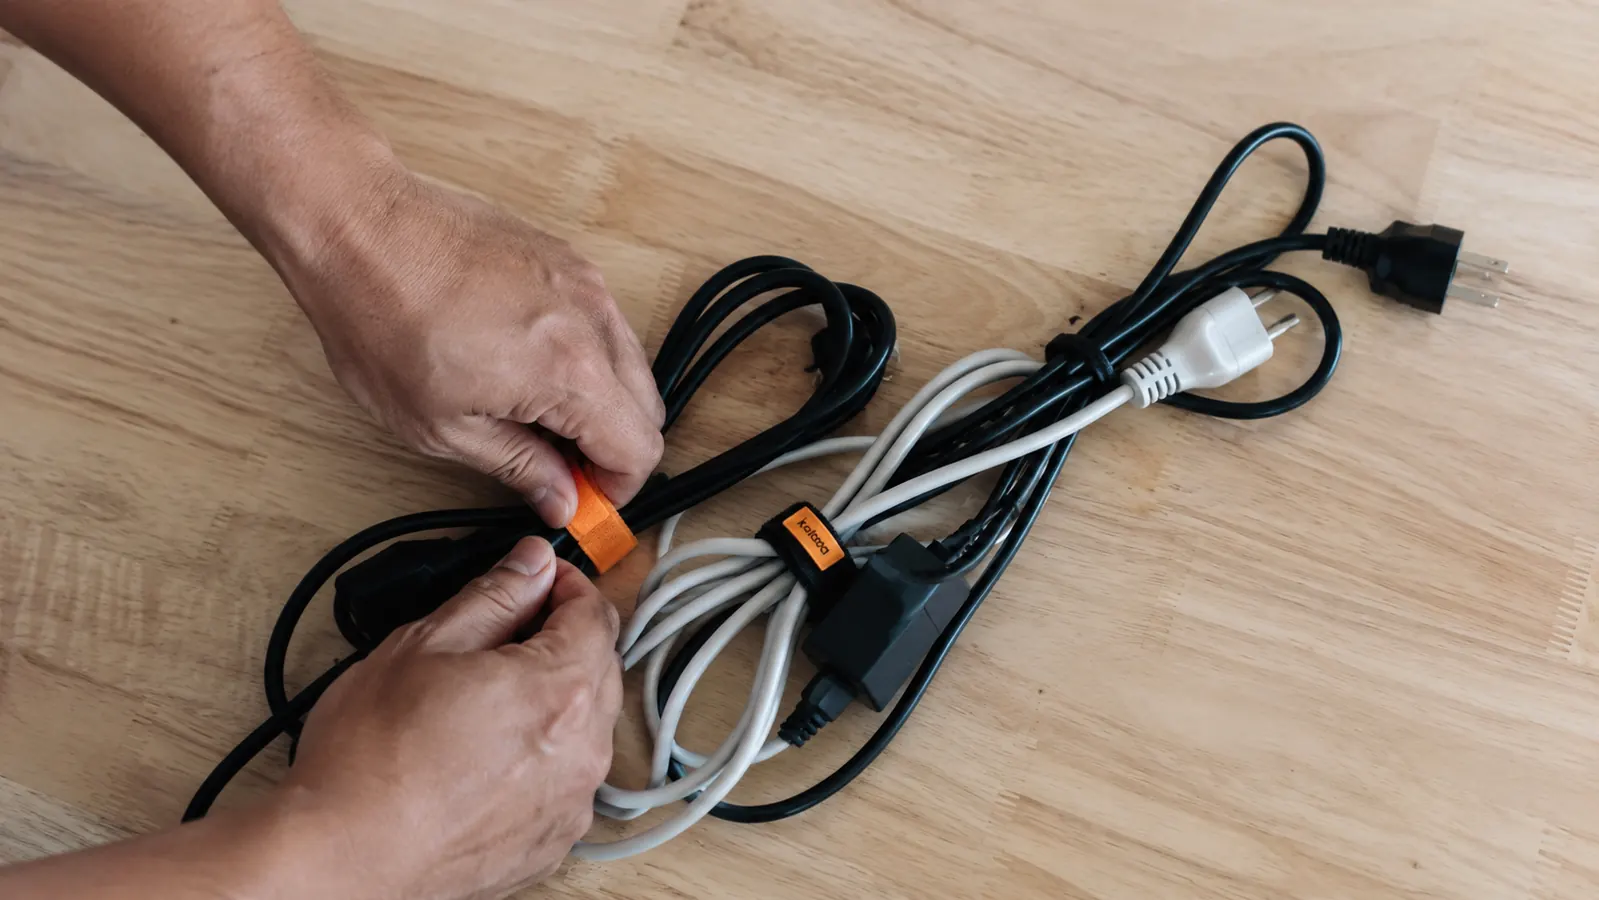
Step 2: Bundle Your Cords With Velcro Ties Before They Go Into the Tray
Velcro reusable cable ties are one of the genuinely good small inventions. You wrap them around a group of cords, press the velcro together, and the bundle holds without any adhesive, any permanence, and any damage to the cables. You can open them and re-sort in two seconds if you add a new device. I keep a small pile of them in a bowl on my shelf and use them constantly.
Before you mount anything, gather all the cords that share a similar path and bundle them loosely. For most desks, you'll have one bundle going toward the monitor, one going to the power strip, and possibly a short bundle for any USB hub cables. Keep the bundles loose enough that cables aren't kinked or bent sharply. The goal at this stage isn't perfection. It's just pre-organizing the cords so they drop neatly into the tray instead of spreading across it like spaghetti.
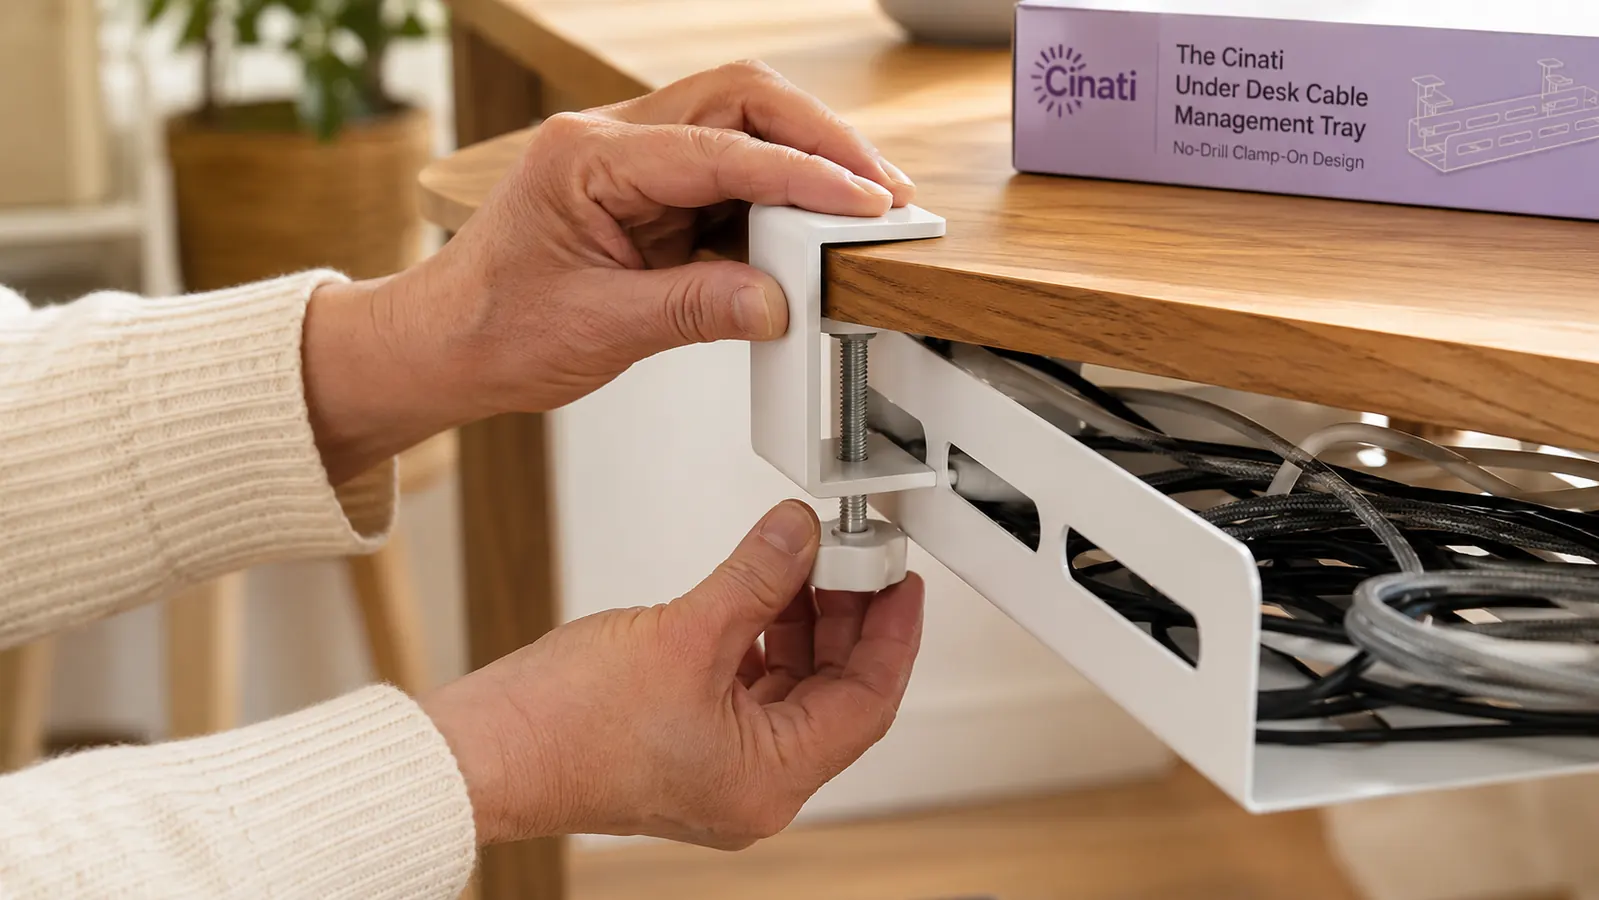
Step 3: Mount the Cable Tray Under the Desk
This is the step most people overthink. With a clamp-mount tray like the Cinati, there is genuinely nothing difficult here. Position the tray roughly centered under the desk, between the two desk legs if possible. The center position gives you the longest run for cable routing in both directions. Slide the clamp screws up against the underside of the desk edge and tighten by hand. You want it snug, not over-torqued. Plastic clamp brackets can crack if you crank them too hard. Firm hand-tight is enough.
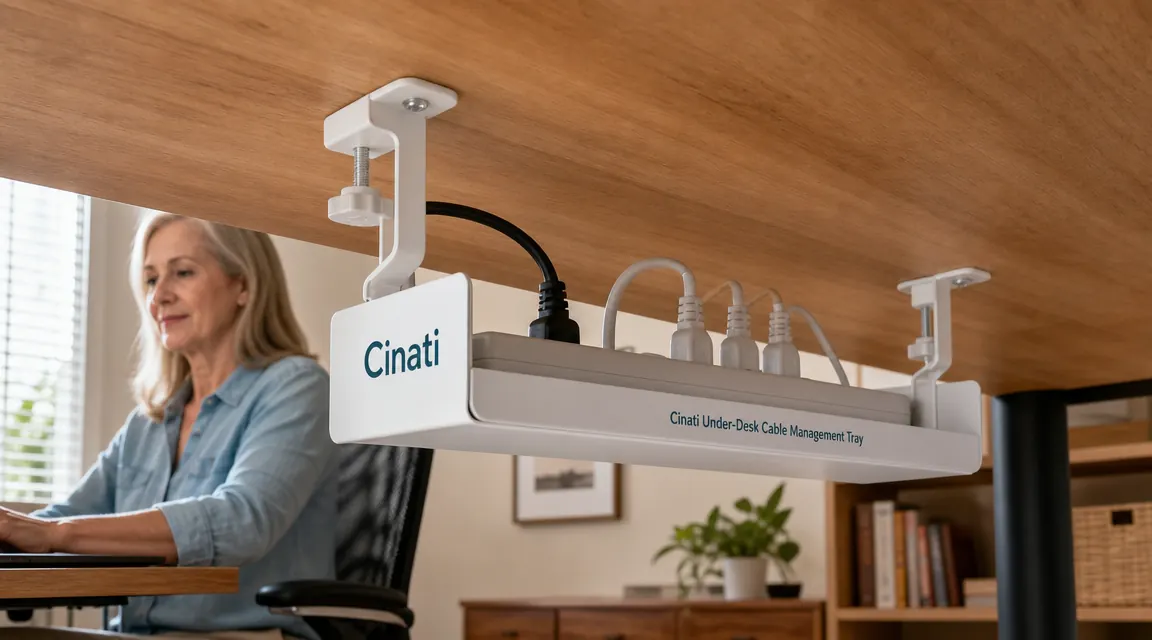
The Cinati tray is rated to hold about 15 pounds, which is more than enough for a power strip plus cables. The tray opening is wide enough to seat a standard power strip sideways, which means you can move the power strip from the floor entirely. That single move eliminates the floor cord run that most people hate most. Once the tray is mounted, set the power strip inside it. You'll notice the desk is already starting to look different from above.
If you have a corner desk or an L-shape, mount a second tray on the return section. Two trays on an L-desk cover almost any cable routing scenario without ever needing a single hole.
Moving the power strip off the floor and into a tray under the desk is the single change that makes the biggest visual difference. Everything else is finishing work.
Step 4: Route the Cables Into the Tray and Along the Desk Edge
Now feed your bundled cables into the tray from one side. The power strip cord goes from the wall outlet up through the side of the tray. Monitor cables, USB hub cables, and laptop charger cables all come off the desk surface, drop behind the desk, and route along the underside back to the tray. For any cable that runs along the desk's underside between the tray and the monitor arm or a desk edge, use small adhesive cable clips, the kind with a peel-and-stick back. These keep the cable against the wood surface so it doesn't hang down into view.
The trick is to give every cable just enough slack to reach its destination without pulling tight, but not so much extra length that it folds over itself inside the tray. Extra cable length folds up neatly in the back of the tray. The tray has a lip that keeps everything contained. Stand up, look at the desk from across the room. Most of the visible mess is already gone.
If you have a single monitor with its power brick, those are the two cables that tend to create the most visual chaos. Power brick sitting on the desk surface is a classic eyesore. A velcro loop around the brick, attached to the cable tray side wall with a small adhesive hook, keeps it under the desk and completely out of sight. This one move cleaned up my setup more than anything else.
Step 5: Handle the Wall-to-Desk Gap
The one stretch most people forget is the gap between where the desk ends and where the wall outlet lives. If your outlet is behind the desk, the power strip cord drops neatly from the tray straight down and into it. Perfect. But if your outlet is on an adjacent wall, you have a floor run to manage.
For floor runs, the no-drill option is a low-profile cable cover channel, sometimes called a raceway, with a peel-and-stick adhesive backing. These are flat plastic channels, usually white or gray, that lie flat along the baseboard. The cord tucks inside and the cover snaps closed. They're invisible from standing height and come off cleanly. I've used them in three different apartments with zero damage to the walls or baseboards. Cut them to length with a pair of scissors or a box cutter. The peel-and-stick holds well on painted drywall and wood trim alike.
If you want to go deeper on which approach works best for your specific desk and room layout, the comparison between an under-desk tray system and a full raceway kit is worth reading. See our breakdown of under-desk cable tray vs raceway kit for a side-by-side on when each method makes sense.
What Else Helps
A few small additions make the whole setup more durable and easier to maintain. First, label your cables at both ends with small write-on tags or pieces of colored tape. This sounds fussy, but after you've tucked everything into a tray and bundled the cords, distinguishing the monitor cable from the USB hub cable becomes genuinely hard without labels. Five minutes of labeling saves ten minutes of tracing every time you need to swap a device.
Second, keep a few extra velcro ties on the desk in a small dish or drawer. New devices come into any desk setup over time, and if you have to go hunting for a cable tie when you add a new lamp or keyboard, you'll just lay the cord loose and forget about it. Having ties on hand means the habit of routing cables stays easy.
Third, if your desk is white or light wood, the white Cinati tray blends in from almost any angle. If your desk is dark wood or black, they also make a black version. Color-matching the tray to the desk underside makes it nearly invisible even from below, which matters if you have a glass desk or a very open work surface that shows the underside.
For a closer look at how the Cinati holds up over time and whether the clamps loosen after a few months of use, see the full Cinati cable management tray review. It covers weight capacity, installation variations across different desk types, and long-term clamp performance.
The Cinati tray is the one product that makes all five steps actually stick.
No drilling, no adhesive residue, and it disappears under the desk. The white version fits most home office desks and holds a full power strip plus all your peripheral cables. Currently rated 4.7 stars with over 4,000 reviews.
Amazon Check Today's Price on Amazon →